The latest release of Security Reporter includes an integration with n8n, making it possible to add another layer of automation and customization on top of Security Reporter without having to write a single line of code! In this series of blog posts, we will describe some workflows you might like to set up if your team wants to integrate Security Reporter with another service, such as Jira.
Short screen recording of the Jira integration in action:
In this first part, we will push (published) findings from Security Reporter to Jira, keep the Jira issue updated when the corresponding finding changes, and sync attachments from Reporter to Jira. In part 2, we will cover syncing back from Jira to Reporter (for example: when an issue is resolved in Jira, automatically request a retest in Security Reporter).
Prefer a different approach? We also have examples using Zapier and our API wrapper:
We often get the question: "Does Security Reporter integrate with Jira?" The answer is a resounding yes! However, not a one-click built-in integration that magically fits every workflow. In practice, teams differ on when to create a Jira ticket, which fields to include, which project it belongs to, and how to handle attachments and formatting.
That is why we prefer the n8n approach: you retain full control over triggers, conditions, and field mapping without having to maintain a custom codebase. And if you self-host n8n, the integration stays completely aligned with the philosophy of Security Reporter: keep sensitive data inside your own environment.
How it works (high-level)
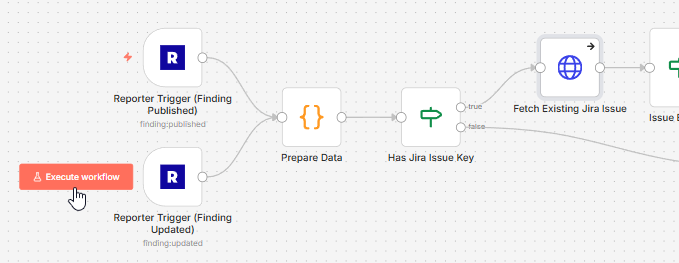
The workflow is built around two triggers:
- Finding Published: when a finding is published, create a Jira issue
- Finding Updated: when a published finding changes, update the Jira issue
Both triggers are gated by a simple condition: only run when the assessment has a Jira project key set. This keeps noise down and makes it safe to reuse the same workflow across many assessments and customers.
- Prepare Data: build Jira fields (summary, labels, priority) and convert Reporter markdown to Jira wiki formatting
- Create or update: create a Jira issue if no issue key exists yet, otherwise update the existing issue
- Link back: store the Jira issue key and link back into the finding custom fields
- Attachment sync: delete older bot attachments in Jira, then upload the current Reporter documents
Step 1: Configure Security Reporter
1. Create a Jira Bot user
Create a dedicated Jira Bot user in Reporter and assign it an admin role. This ensures that any activity originating from the Jira integration is easily distinguished from human user activity. (FYI: We plan on making this easier using service accounts in a future Reporter release.)
2. Create a Dedicated API Key
Logged in as the Jira Bot user, create an API token for n8n.
Name: n8n
Permissions:
- Assessment: Read
- Finding: Read and Write
- Document: Read
- Finding Event: Read and Write
- Webhooks: Read and Write
3. Add custom fields for Jira linking
We will use custom fields so that each assessment can define its own Jira project key, and each finding can store the Jira issue key and issue link once it is created.
- Assessment: Jira Project Key (field name:
c_jira_project_key, type 'Text') - Finding: Jira Issue Key (field name:
c_jira_issue_key, type 'Text') - Finding: Jira Issue Link (field name:
c_jira_issue_link, type 'URL')
4. Add the Jira fields to your finding layout
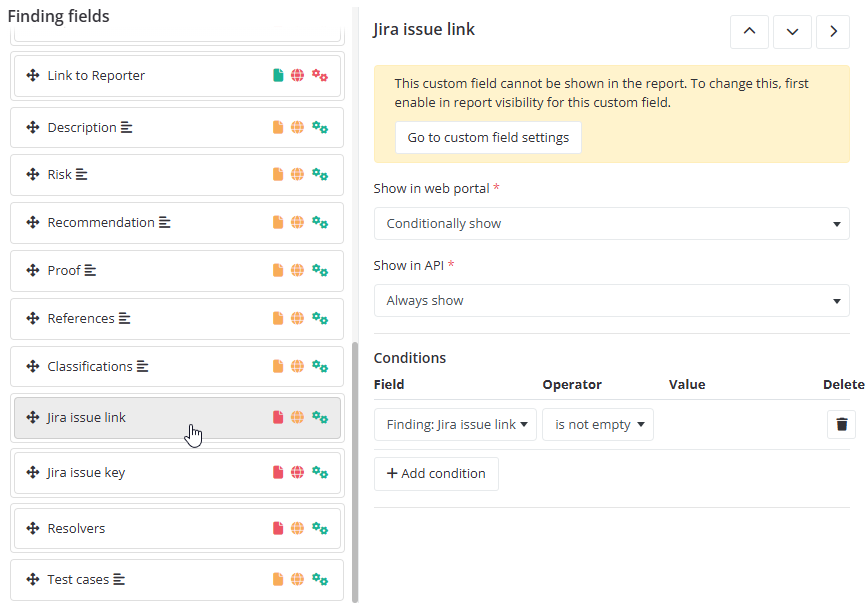
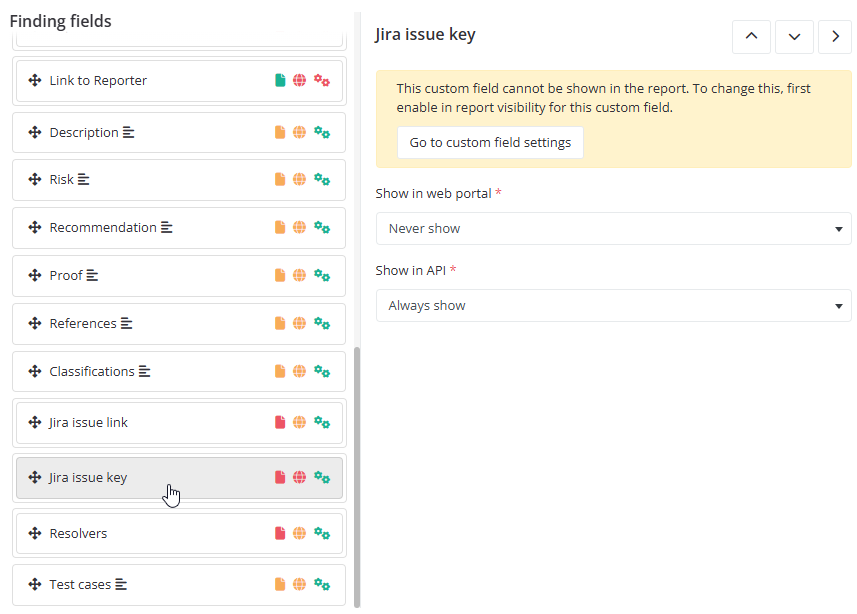
Add the Jira link field to the finding layout so users can click straight into Jira. The Jira issue key field can be hidden from normal users if you only need it for API communication.
Jira issue link:
Jira issue key:
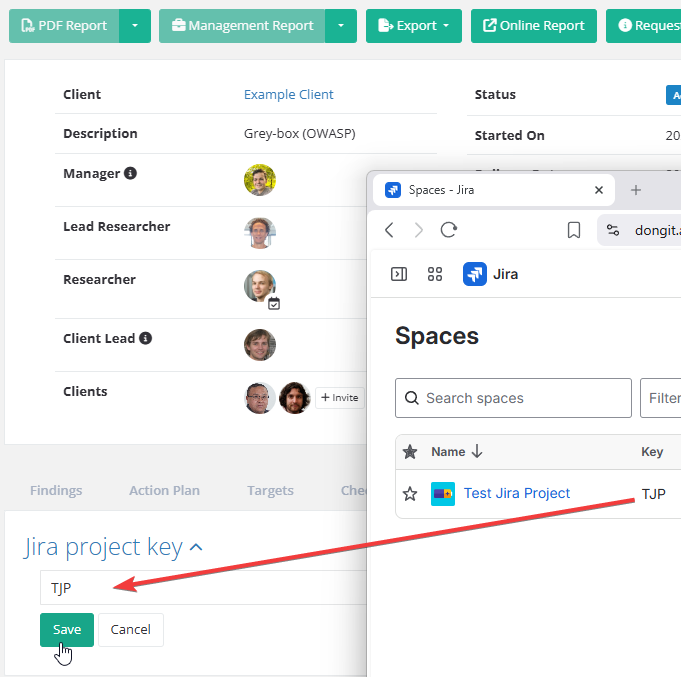
5. Set a Jira project key on the assessment
Edit (or create) an assessment and set the Jira project key. This tells the n8n workflow where to push findings from this specific assessment. Only assessments with this field set will trigger Jira ticket creation.
Step 2: Configure Jira
For Jira, we will create a dedicated service account to handle the incoming requests from n8n securely using OAuth 2.0.
1. Create a Security Reporter Service Account
Set up a service account for Security Reporter within your Jira instance.
2. Create OAuth 2.0 Credentials
Be sure to select the classic scope type and grant the following permissions:
read:jira-workwrite:jira-work
Atlassian guide: Create an OAuth 2.0 credential for service accounts
Step 3: Configure n8n
The final step is to bring all the pieces together within your n8n instance.
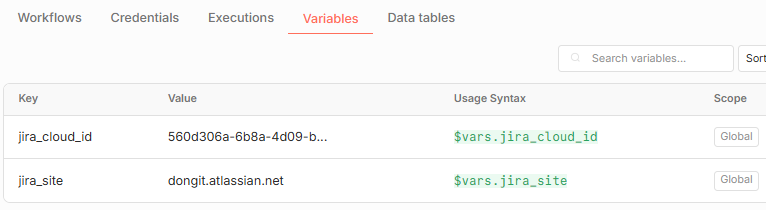
1. Get your Jira Cloud ID and site
The workflow uses Jira's REST API via Atlassian's api.atlassian.com gateway, which requires your Jira Cloud ID. You can retrieve it by visiting:
https://<your-site>.atlassian.net/_edge/tenant_info2. Set n8n variables
Create two variables in n8n:
jira_site(example:your-site.atlassian.net)jira_cloud_id(fromtenant_info)
If you are using the n8n Community Edition, you can hardcode these values directly in the workflow. We will import this workflow in the next steps.
3. Import and Configure the Workflow
Import the workflow JSON into n8n and use it as a starting point.
Once imported, configure the necessary credentials:
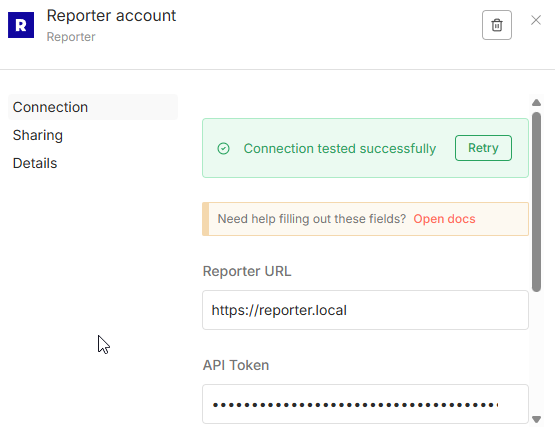
Security Reporter: Configure the Reporter credentials in n8n using the API token you created in Step 1:
Jira: configure OAuth2 API credentials for your Jira service account: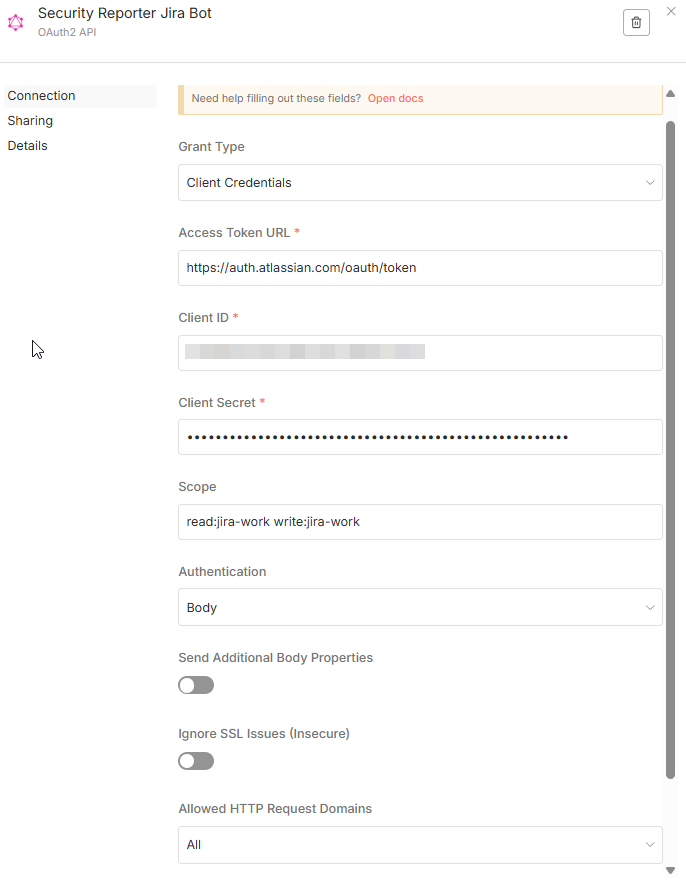
Step 4: Testing and Customization
You are now all set! Try it out by clicking "Execute Workflow" in n8n, and then publish a new finding in Security Reporter to trigger the webhook.
If you are happy with the result, hit "Publish" for the workflow. The workflow's "prepare data step" is important to review, as it converts Reporter's markdown into Jira wiki syntax and shows how the final contents of the Jira issue are constructed. This is where you can customize exactly what data is set and how it is formatted.
Naturally, you can also customize the Reporter triggers to specify conditions under which the workflow should run (e.g., only for high-severity findings).
Closing Words
You might be wondering why we don't simply use the built-in n8n Jira nodes. The reason is that they are currently too limited and don't support service account credentials. Our API-driven approach ensures you have the full power and flexibility required for enterprise-grade security workflows.
Remember, this is just an example. Feel free to modify and expand it to fit your unique security operations.
Stay tuned for Part 2!
In the next blog post, we will cover the reverse process: syncing status changes (such as 'Resolved') from Jira back to Security Reporter to automatically trigger actions, such as a retest request.